

Build the Pinewood Derby® Legend:
The Flying Wedge
The instructions given on this webpage are intended to convey general information about building the car. Guards have been removed from equipment in many illustrations for clarity. Always read and follow manufacturer’s instructions for specific equipment. Under no circumstances should minors operate a band saw or router.
This site recommends the use of lead as a weight. Know and understand the risks associated with lead before deciding to use it in your design. Keep lead away from children and never sand or grind it. Do not use a car containing lead as a toy. Wash your hands thoroughly after touching lead. See http://www.epa.gov/lead/ for more information about lead and lead poisoning.
While the design on this page has a proven track record as a top contender, there is no guarantee that you will win. Please encourage your child to understand the importance of doing your best rather than winning.
“Build the Pinewood Derby® Legend: The Flying Wedge” IS NOT AN OFFICIAL PUBLICATION OF THE BOY SCOUTS OF AMERICA. THIS PRODUCT IS NOT ENDORSED OR SPONSORED BY THE BOY SCOUTS OF AMERICA. BSA, Pinewood Derby and Cub Scouts ARE REGISTERED TRADEMARKS OF THE BOY SCOUTS OF AMERICA
The Boy Scouts of
America does not sanction or endorse the plans and modifications on this site.
© 2012 BoysDad.com
All rights reserved.
Forward
The Pinewood Derby® has been bringing out the competitive spirit of boys for decades. Ever since I lost my first race back in 1977, I have been looking for ways to make my cars more competitive. In 1996, my oldest son was born, and I knew I might get a chance to get back into the races again. Three more sons followed, and soon making pinewood derby cars became more like a second job than a hobby. We raced in our local Cub Scout pack and also in Royal Ambassadors® races at our church. Each year our cars performed better and better, and each year we won more and more.
Sadly, now all my sons have outgrown Cub Scouting, but our love for the Pinewood Derby® has not diminished. In my spare time I have been giving advice on my blog. Each year, tens of thousands of people visit my blog online. I get a great sense of satisfaction when I read about how well their sons (and daughters) do in their races. It is my hope that you and your child will experience the joy of building a car that finishes well and that represents your love for craftsmanship, competition, and you child. It is this kind of time together that will make memories that will last a lifetime.
Remember, there is no sure-fire way to win any kind of race. Pinewood Derby ® races are won by hundredths, even thousandths of a second. To be the fastest, a car must be built to exacting standards and must optimize the physics of the race. I firmly believe the design on this page, when properly built, will produce a car that has the potential to place first in any district race against any other design.

Before you begin…
Safety First
You can’t replace your eyes, fingers, or health. Be sure to follow the manufacturer’s instructions for all tools and materials used in your project. Power tools are inherently dangerous and should be used by a competent, properly trained adult. All work on the car should be done under the supervision of a competent adult.
Many of the chemicals used in this project are harmful. Read and understand manufacturer’s instructions provided. Also, request a Material Safety Data Sheet (MSDS) where you buy your materials for any substances that you may be allergic to or otherwise concerned about. In addition to lead, other products commonly used as weights in Pinewood Derby® cars may be hazardous. Some tungsten welding electrodes contain thorium, which is radioactive. Know the risks of any materials you may be using.
Know Before You
Build
The design on this page is intended to comply with the BSA® sample rules that were included in the kit at the time it was written. Please be aware that these rules are subject to change, and that most packs and districts have rules that are more restrictive than the sample rules. If you have any questions about the legality of a particular modification, CHECK WITH YOUR LOCAL RACE AUTHORITY.
Read through this page in its entirety before you start. You may not be able to produce the design in exactly the same way it is shown here. You need to be able to make changes in the design before you start.
Contents
A Look at the Official
BSA® Kit
Step 2 – Drill the Weight Holes
Step 4 – Rout the Weight Cavity
Step 8 – Attach the Weight Adjusting Screws
Step 10 – Prep the Car for Assembly
Introduction
The Pinewood Derby® is as much about making memories together as it is about winning. If you participated in the derby as a kid, you know what I am talking about. This race is one of the high points of Cub Scouting, and something all the kids get excited about. Let it be their race. Let your son do as much of the building as he safely can.
This post is not about “winning” the pinewood derby, but it is about doing you best. Doing you best at the Pinewood Derby® means understanding the fundamentals of the physics of the race, and optimizing your design to take advantage of them. If you ignore the physics of the race, you are leaving them to chance. You may do well in the race, but it won’t be your best.
The race is also about craftsmanship. Your car may have a super design, but if it is built poorly at the last minute, you cannot expect to finish well. Plan carefully, well in advance of the race, and you will be able to take your time to do each step right.
This post is written in two main parts. The first half explains race fundamentals that apply to any design you choose. The second half is a step-by-step manual of how to build a design that I have found to be particularly successful. Don’t feel like you have to build the car to these exact specifications. As long as you understand why the car is designed the way it is, you can apply the theories and techniques in this post to any car.
Tools and Materials
Required
To build a top-performing Pinewood Derby® car does take tools — power tools. Someday I may write a post about how to build a car with only a pocket knife, but this is not it. However, some tools are more necessary than others. Below is a list of the best (not the only) tools for the job. Hopefully, you may have access to some or all of the tools on the list. If not, ask around. Somebody in your pack will be willing to help out. I can speak for them, they are good guys: they are Scouts.
I have rated each tool to indicate how important they are to this particular project. You really need everything (or a reasonable substitute) on this list, but you need a drill press more than machinists square.
Tools
The following tools
- A Band Saw
- Router & Table
- Need ¼ inch diameter straight plunge router bit
- Drill Press
- Drill Bit (3/8 diameter)
- Drill Bit (Number 49, .073 inch diameter)
- Calipers (preferred) or a ruler that can measure to at least the nearest 32nd of an inch
- Digital Kitchen Scale (Must have)
- A Combination Square or Machinist’s Square
Materials
Some of these materials can be substituted or omitted completely. Check through the text of this post and see where they are used. Don’t wait until the last minute to get these; you might be surprised how fast some stores can run out of graphite during Pinewood Derby® season.
·
- Aluminum Tape
- BSA Pinewood Derby® Kit (buy at least 2)
- Graphite Powder (2 tubes)
- Sandpaper (assorted, through 2500 grit)
- Steel Wool (#000)
- Lead (or other weight)
- #8 Machine Screw (Flat head, 1” long)
- #8 Flat washers
- #8 Star washers (optional)
- #8 Nuts (2 required)
- 5 Minute Epoxy
- Spray Paint Primer (high build)
- Spray Paint Finish
- Spray Paint (Clearcoat
- Jeweler’s Rouge (polishing compound)
- Scrap wood pieces (including a piece of plywood 7 x 14 inches)
A Look at the Official
BSA® Kit
Sample Rules
The rules that are included in the kit are only a general reference. Almost all packs and districts have their own rules. Be sure to know the specific rules that will govern the event(s) you will be participating in. The rules will affect how you build the car.
Here is a look at the rules as they were printed in the last kit I bought:
All cars must pass the following inspection to
qualify for the race:
- Width shall not exceed 2-3/4 inches.
- Length shall not exceed 7 inches.
- Weight shall not exceed 5 ounces.
- Axles, wheels, and body shall be from the materials provided in the kit.
- Wheel bearings, washers, and bushings are prohibited.
- No lubricating oil may be used. Axles may be lubricated with powdered graphite
or silicone. - The car shall not ride on any kind of spring.
- The car must be free-wheeling, with no starting devices.
The Block
The block is (as you might expect) made of pine. Since wood is a natural product, the weight of each block will vary considerably. Add to this the fact that pine absorbs moisture from the air, and the same block may vary in weight depending on the weather conditions when you measure it.
The blocks actually tend to be quite square on their own, and the slots tend to be square. However, don’t count on this. If you have two blocks, try each one with a machinists’ or combination square to check for squareness. Particularly when drilling holes for the axle (this is discussed in more detail later in the post).

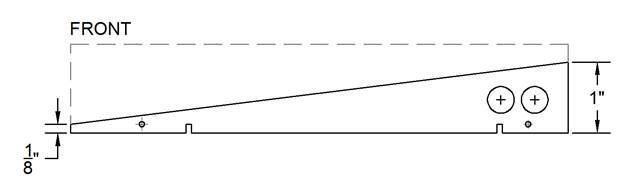
The block is approximately 7.0 inches long, 1.75 wide and 1.25 tall. The block is provided with two slots for the axles.
Some rules may stipulte that the axles must be put into these slots. The plan in this article assumes that you can drill you own axle holes. The advantage of drilling your own holes is that you can increase the wheelbase, making for a more stable design. Increasing the wheelbase also allows you to put the weight farther back (increasing the cars potential energy).
The Wheels
All wheels are not created equal. If you bought two kits (something I highly recommend), you can pick the best four for your car. I select the best wheels by spinning each wheel on a a polished axle (discussed later in the post). If a wheel shimmies, wabbles, or vibrates excessively, don’t use it.
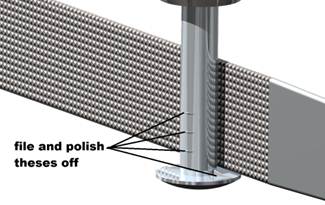
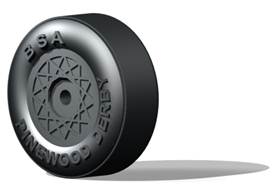 Even the best wheels out of the box are not winner material. The wheels all have a small nib on the surface that contacts the ground. This is an artifact of the manufacturing process used to make the wheel and must be removed.
A simple way to get the outer surface smooth is to use a “wheel polishing mandrel.” I don’t recommend a lot of the Pinewood Derby “gimick” products, but the wheel mandrel is actually very useful. This tool allows you to chuck your wheel in an drill.
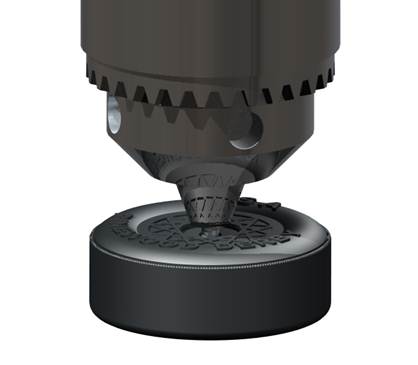 Ssecure the mandrel in your drill press by inserting the shaft all the way in. This makes a rigid setup that will allow you to work with little vibration. Then use sandpaper to polish the wheel smooth.
Note that some rules require the small ridges on the wheel periphery to remain intact. If this is the case in your district be sure not to polish them off.
The official BSA® wheel have a lot more plastic than is necessary to support the car. This means more mass to rotate, and hence a slower car. If your rules allow, you may consider “wafered” wheels or other high performance wheels. This will be discussed later in this post.
The Axles
The BSA® axles are not much more than an ordinary nail. They all have marks (called burrs) from the manufacturing process used to form the head. Don’t spin the wheels on the axles until these marks have been polished away.
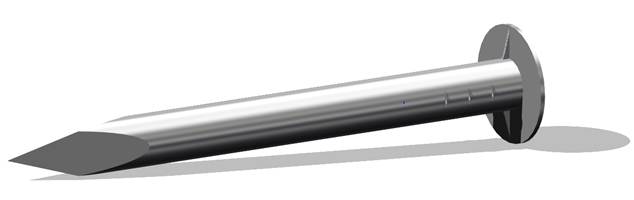
Many people recommend machining a particular profile on the axles. I have found the best axles to be simply cleaned and polished. To remove the marks, chuck the axle in a drill and slide a file gently along the surface of the nail. Keep the file moving as the drill spins to produce a uniform surface. It doesn’t take long to remove the marks.
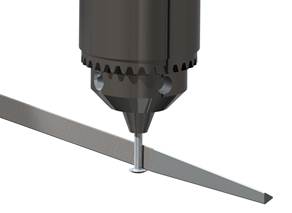
After the initial deburring, you need to get the nail to a highly-polished shine. This can be achieved using waterproof silicon carbide sandpaper. Start with a grit of about 400, then work up to 1000, 1500 and finally 2000. This will bring out an almost mirror finish on the surface. I use jeweler’s rouge on a paper napkin to get the surface to a perfect mirror finish.
Physics of Gravity
Racing
Gravity is the only source of energy that is making your car move. There are only a limited number ofphysical factors that affect how fast the car will go. These are:·
- Air Resistance
- Friction
- Potential Energy
- Rotational Inertia
None of these can be ignored if you are to have a top-performing car. However, some of these are more important than others. Here is a brief look at each of the physical factors affecting your car’s performance.
Air Resistance
Air resistance is going to be the least of your worries. If you are building the Flying Wedge, you will be well on your way to minimizing your wind resistance. Resist the temptation to glue an action figure to the top of the car if you really want maximum speed.
To reduce the Flying Wedges’ wind resistance on the underside, some people like to apply pressure-sensitive label over the weight adjusting cavity (the hollow area under the car). I avoid doing this because I want to be able to easily adjust the weight at the check-in. I don’t think the reduction in wind resistance is worth the weight penalty.
Friction
Friction is extremely important. You want to reduce friction wherever you can. The first place where friction is a factor is on the axles. Be sure your axles are polished to a mirror finish (see above). With the axles clean and polished you can leave the work of eliminating friction on the axles to the lubricant.
The only lubricant allowed at many races is powdered graphite. Graphite is a great lubricant, but it can be a little messy. You will need to get plenty of graphite down inside the wheel hole. After I get my wheels cleaned up and polished, I like to dump an entire tube of graphite into a plastic bag (cut the crimped end off) and put the wheels into the bag. Every day I have my son massage the graphite onto the surface of the wheels. This not only gets graphite inside the wheels, it coats the outer surfaces of the wheels. The wheels should have a metallic sheen to them. This is important because the wheels will rub the center rail occasionally, and this friction should be reduced as well.
To be sure that the inside of the wheel hubs is coated, I use a pipe-stem cleaner that has been coated with graphite. I run the cleaner back and forth while dumping graphite on it. Do this until the inside is thoroughly coated.
Another place to be sure to coat with graphite is the area around the axle holes in the car body. After the car has been painted, stick your finger into the graphite powder and gently rub it on the spot where the wheel hub will contact the car. Before long, this spot will become thoroughly coated and begin to shine.
Potential Energy
The only source of power your car has is the energy it gets from being lifted up onto the track. The amount of energy that a car has can be measured by knowing where the car’s center of gravity is. The center of gravity is the point that the car will balance on. If you take a yardstick, you know that it can be balanced on your finger at the middle point. That point is where the weight to the right is balanced by the weight on the left. The center of gravity does not have to be in the geometric center of an object. Imagine if you glued a bolt to the yardstick, the center of gravity would be closer to the bolt. This fact allows you to get more energy out of your car.
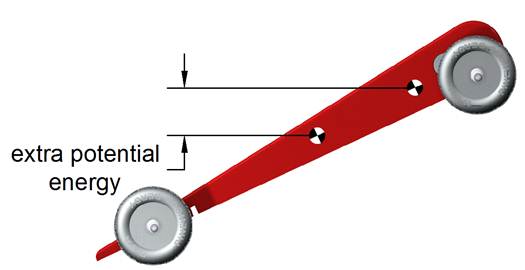
The amount of energy a car has depends on how far the center of gravity falls during the race. If you can put more of the car’s weight toward the rear of the car, the center of gravity will fall farther that it would if it were at the middle of the car.
You won’t notice the difference between cars that have different centers of gravity until they get to the level part of the track. The cars with rearward centers of gravity will seem to accelerate ahead of the others at this point. This is because there is no difference until all of the potential energy has been converted into kinetic energy. This happens as soon as the cars reach the level part of the track. If Pinewood Derby® races did not have the long, level strip it would make no difference where you put the weight. As it happens, the tracks do level out, and so it does indeed make a difference.
A word of caution: If the center of gravity is too far back, however, the car may wheelie off of the track. This is because there is not enough weight holding the front of the car down. The condition of the track is more of an influence on whether cars stay on the track or not. I recommend helping set up the track to be sure the transitions are smooth. The Flying Wedge design depends on a track being in excellent or good condition. If your track is known to be rough, you may consider moving one or both of the weight holes forward. You will need to reduce the length of the weight adjusting cavity if you do this.
Rotational Inertia
Take a broomstick in your hand. If you spin it around like a baton, it spins slower that if you spin it around its axis. The resistance to spinning you feel when rotating it like a baton is rotational inertia. The main thing to know about rotational inertia is that weight farther away from the axis of rotation is much harder to spin. This means that the weight on the periphery of your wheels cost you more speed that weight at the hub.
Some people have their wheels turned in a lathe to remove some of the material from the “tire” portion of the wheel. You can also remove some of this material by using the “wheel polishing mandrel” discussed above. It takes a lot of patience, but if it is allowed by your rules, will pay off on race day.
Another way to remove some of this inertia is to raise one of the wheels higher than the other three. This keeps one wheel from having to turn at all. Some people remove the fourth wheel and replace it with a pin or other device. I don’t recommend this because if the car tips, it is good to be able to have a wheel available to roll if necessary.
You will notice cars with different rotational inertia loads at the upper part of the track. The cars with light wheels will start quicker and finish faster than ones that have to put a lot of energy into spinning their wheels.
Building the Flying
Wedge
Before you begin…
Remember, this design in this post is written to comply with the BSA® sample rules that are included in the kit. Please be aware that most packs and districts have rules that are more restrictive than the sample rules. If you have any questions about the legality of a particular modification, CHECK WITH YOUR LOCAL RACE AUTHORITY before you begin.
Step 1 – Drill the axle
holes
The axle holes are a key element in this design. These holes must be precisely placed, and they must be square with the block and with each other if the car is to run true. It is difficult (impossible) to correct at car’s alignment after it has been built. The quality of the axle holes determines how straight a car will run. A car that does not run straight loses precious energy each time it bumps against the guide rail in the center of the track. Drill the holes right the first time.
You will need to measure very carefully, to within better than 1/64 of an inch. I use a needle and a machinists’ square to lay out the
hole locations.
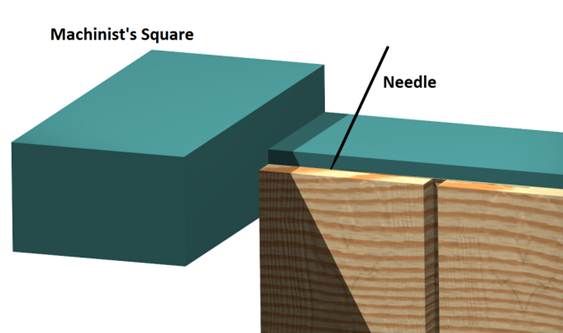
When you have the crossing lines for the two dimensions, use a thumbtack as a center punch to help the drill bit start in the proper place. You will need to use a drill press to drill the axle holes. If you do not own a drill press, you really need to make friends with someone who does. There is really no substitute.

Once the hole is properly marked, ensure that the drill bit is perpendicular to the drill press table with a machinist’s square. Then make sure the block sits squarely on the table. Measure each hole carefully, and notice on the drawings that the two sides of the car are different. This allows one wheel to sit above the track (see rotational inertia, above).
Drill ONE SIDE as shown…
The holes should be about ¾ of an inch deep.
This side of the car has the raised wheel. Notice where the holes are in relationship to the factory axle slots. These slots and the holes you will be drilling are not symmetrical.
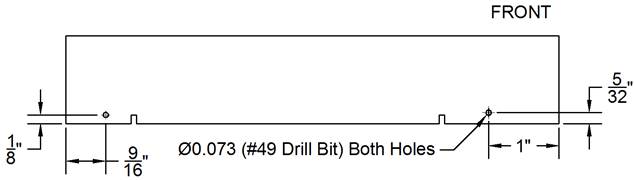
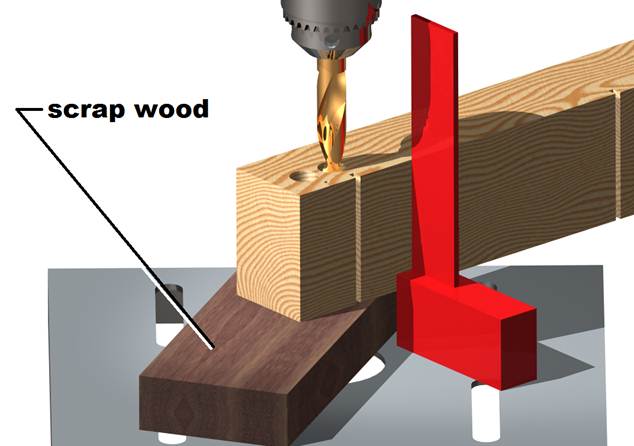
Step 2 – Drill the
Weight Holes
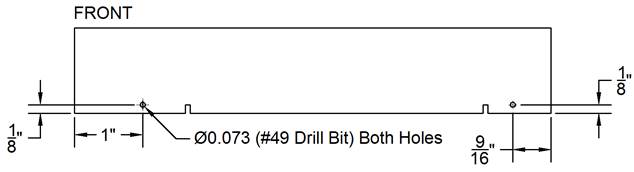
These holes go all the way through. Use a piece of scrap wood underneath the block to keep the drill bit from breaking out wood splinters. Use a Number 49 drill bit (.0730 diameter) as a pilot drill. Don’t use increasingly larger drill bits, go straight from the pilot drill to the 3/8 diameter drill bit.
Although it is not as important as the axle holes, you will have fewer problems if these holes are precisely and accurately made. The drawing below indicates the location of the two weight holes. BE SURE TO orient the holes correctly. They are at the rear of the car!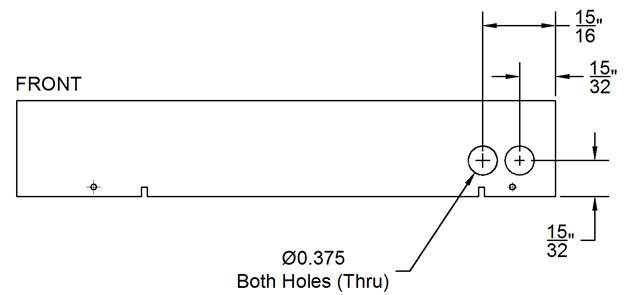
Step 3 – Saw the Car
Body
Mark the car as shown below. Saw so that you just barely leave the line (See the illustration). Don’t saw down the middle of the line.
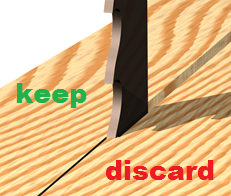
A band saw is the best way to do this. You can saw the curved edge at the back rear of the car with the band saw if the blade is thin enough to make the curve. Otherwise, you can sand it round later. Children should never be allowed to operate a band saw. These are FINGER REMOVING MACHINES.
Step 4 – Rout the
Weight Cavity
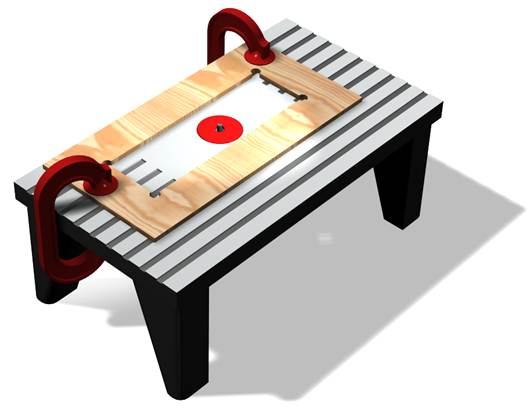
 This part may seem like a lot of trouble, but it is one of the best features of the Flying Wedge. The weight cavity allows you to easily fine tune the weight of the car. You really need a router table and a jig to do it, but it will pay big dividend if it is done properly.
Like the band saw, routers are dangerous and must be operated by a competent adult only.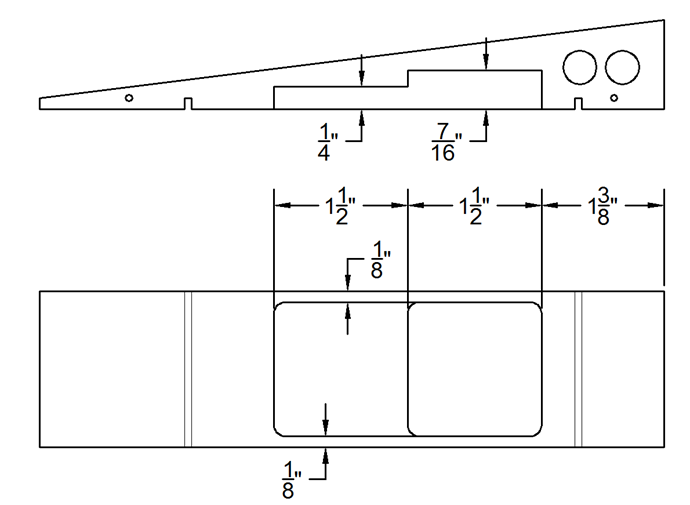
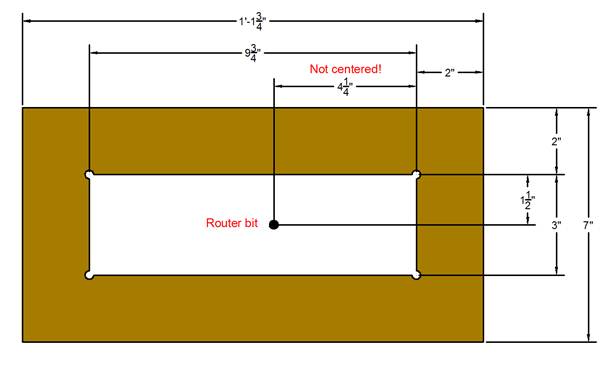
First you will need to make a jig to guide the car on the router table. This can be made from a scrap piece of plywood.
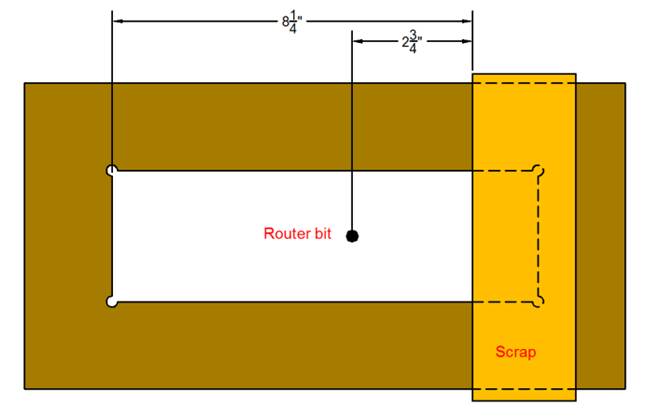
Lay out the rectangle below on the plywood. Then drill four holes .5 inches in diameter. The purpose of the holes is to give your saw a starting place and also to allow the car to fit properly into the corners.
When the holes are drilled, use a saw to cut the rectangle out. You really need to be precise, as the shape of the cutout will affect the geometry of the car. You can use a number of different types of saw to cut this out. You might also consider using a flush trim router bit to clean the edge up.
The jig not only needs to be made properly, but it must also be placed on the router table precisely. Notice that the jig is not centered on the bit.
You will first use the jig to cut out the longer rectangle of the cavity.
Clamp the jig securely in the proper location. Be sure to follow the router manufacturer’s instructions. Set the router cutting depth to ¼ inch and turn it on. Ease the car down onto the bit in a circular motion being careful to keep your fingers clear of the bit.
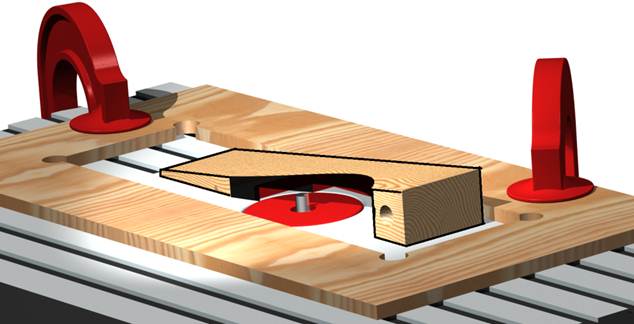
When the bit is fully inserted into the wood, use a rectangular motion to cut the first layer of the cavity out.
 Now you need to cut the shorter, deeper section. Keep the jig clamped in place, and add a piece of scrap as shown below. This will make the deeper section the right size. Adjust the router depth to 7/16 of an inch. Measure this carefully, because if it is the router cuts too deep, it will cut through the top of the car.
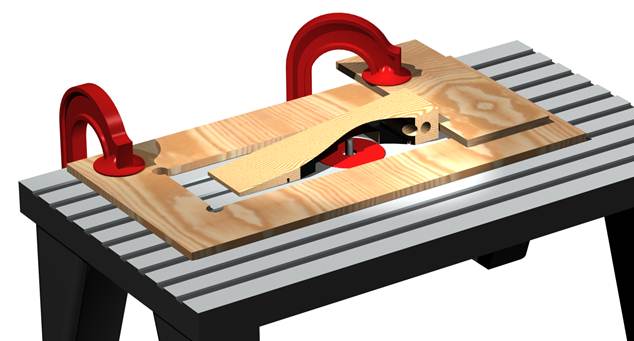
Now use the same procedure as above to cut the deeper
section of the cavity.
Step 5 – Sand the Block
If you did not cut the curves on the back of the car with the band saw, they are easy to add by sanding. Us a rough grit sandpaper (such as #60) to do the rough shaping. Then use progressively higher numbered sandpaper to get the surface ready to be painted. You will want to sand the surface to a very smooth, shiny glow. The quality of the final paint job depends on how well you sanded the block. Of course, you don’t need to worry too much about the bottom of the car, but the top needs to be almost perfect. This is a typical sanding sequence.
- #60 for rough shaping
- #100 smooth shaping
- #200 rough finish sanding
- #400 fine finish sanding
- #000 Steel wool, pre-paint smooth finishing and sanding between coats of paint.
Step 6 – Add the Weight
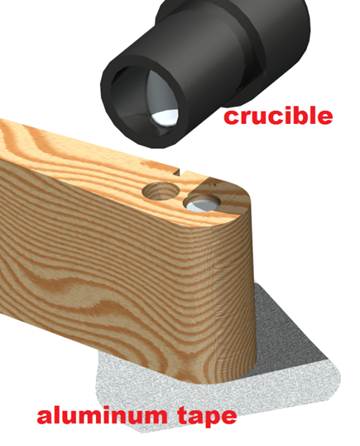
About Lead. The weight recommended for use in this design is lead. There is one obvious disadvantage of lead, and that is the fact that it is poisonous. Lead poisoning affects millions of kids each year. If you do choose to use lead, be aware of the risks (See epa.gov/lead for lead information). You can buy 3/8 inch lead wire by the foot online, and you will not have to melt it. However, sawing or grinding lead can be more dangerous than melting it. It leaves small shavings around that can be easily ingested by kids. No matter how you get the lead in, NEVER SAND YOUR CAR AFTER THE LEAD IS IN PLACE. Also, you can’t let the car become a toy after the race. Keep it away from younger siblings, and inform all your children of the danger of lead poisoning.
Lead can be melted safely (many types of solder contain lead), but it must be done outside with adequate ventilation. Make sure your kids are far enough away to minimize their exposure to the fumes. You can buy lead and lead melting ladles online and at many sporting goods stores.
I use aluminum tape on the back side of the holes to prevent the molten lead from leaking out the back side of the car. Fill each hole to the top with the molten lead. Be careful not to burn yourself!
Step 7 – Pre-Check the
Weight
Now is the time to begin getting the weight right. It is easier to make changes before the paint is applied and the wheels are in place. Take all of the car’s components and place them on a digital kitchen scale. Don’t forget to add the two #8 weight adjusting screws that will be glued to the bottom of the car. Also add two #8 nuts and washers to make sure they are accounted for. If you are going to take mass out of the wheels, do it before you do the weight pre-check.
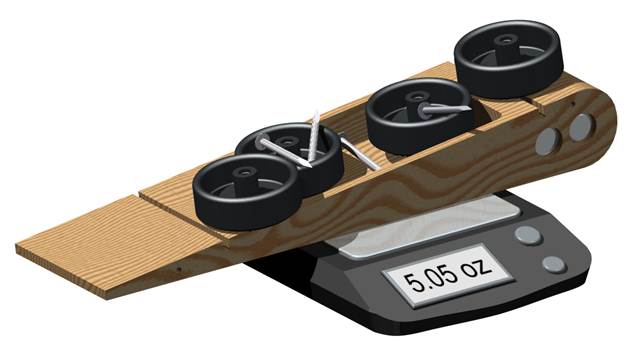
You want to be as close to 5.0 ounces as possible. If you have to add a lot of washers to get the weight to go over 5.0 ounces, you may consider adding a stick-on weight (available from Hobby Lobby and online). If you are over 5.0, you may need to drill a small amount of the lead out.
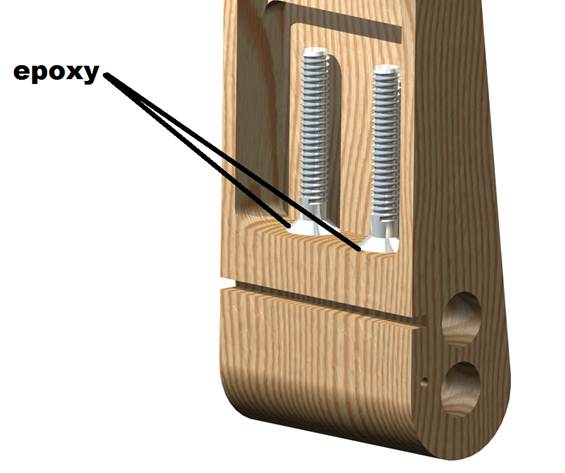
Step 8 – Attach the
Weight Adjusting Screws
A prime advantage of the Flying Wedge is the ability to fine tune the weight and center of gravity using two screws attached to the underside of the car. These allow you to get your car as close to the legal limit as possible. The minutest difference in weight can be the difference between winning and losing.
Attach the screws with 5 minute 2-part epoxy. Be generous with the epoxy. Try to coat the entire edge of the cavity with it. If the screws come off, you are not going to do very well at all. Fixture the car in a vise so that the nose points up. It is important that the car be level because the screws can “float” around before the glue dries.
Be aware that some people develop severe allergies to epoxy products, so read the package and minimize your exposure to it.
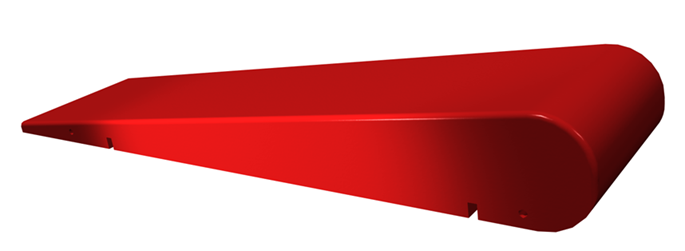
Step 9 – Paint and
Decorate
Remember that you never want to sand the lead that is in the holes at this point. This releases poisonous lead dust that can easily get into your body. The holes at the rear of the car will not be seen because they will be behind the wheel anyway. But you do want your car to look its best.
This is one area that should be done completely by your son. He probably knows exactly what color the car should be, and he will be able to get good results with a little training, practice and supervision.
You will need to support the car on toothpicks. You should be able to stick them into the axle holes, but don’t jam them in if they don’t go easily. You do not want to enlarge the holes. Rest the toothpicks on some scrap wood and you are ready to begin painting. Be sure do painting outside, and follow the manufacturer’s instructions.
Begin by spraying a primer coat on the car. Use a “high build” primer for best results. If you do not prime the car well, the wood grain will show through. You may want to use more than one coat of primer.
At this point you can rub the car down with steel wool to “knock down” the texture of the primer. Be sure to keep the car free from any grease or dirt since this will affect the final results.
For the top coat, select a paint with a glossy finish. The paint should be applied evenly. Use several light coats instead of one heavy coat. Resist the temptation to see if it is dry until a reasonable time has passed.
Finally, add a glossy clear coat to really bring out the luster of the paint. If you use a metallic paint, a clear coat makes a huge difference in the way the car looks.
Step 10 – Prep the Car
for Assembly
By now you wheels and axles should be fine-tuned and coated with graphite. You now need to lubricate the car body with graphite. One of the great things about graphite is the fact that it tends to cling to the surface you are applying it to. This is good, but it also means that if you get graphite all over your new paint job it is going to stay there.
You need to lubricate the surface where the wheel hub rubs against the car body. You can do this by sticking your finger into the graphite powder and gently pressing the graphite against the surface of the car where the axles go in. Rock your finger back and forth, rotating the graphite around the hole. Repeat this with more and more graphite until it takes on a metallic sheen. The more you do this, the better. You really want a lot of graphite in this critical area.

Step 11 – Assemble the
Car
Before assembling the wheels onto the car, there are two things to take care of. You want to find the “sweet spot” on the axle, and you want to get graphite down the wheel hub.
The sweet spot is the optimal orientation of a particular axle with a particular wheel. Take a wheel and slide it onto an axle. Hold the axle between your thumb and index finger. Now give the wheel a medium speed spin (not fast enough to chatter, but fast enough spin for several seconds). While the wheel is spinning, rotate the axle with your fingers. As you rotate the axle you will find some point at which there is no vibration and no sound. That is the sweet spot. Mark it with a fine-point permanent marker.
Keep in mind that gravity is working in the opposite way on the wheel/axle combination when they are in your fingers than it will when they are on the car. You should install the axle into the car with the sweet spot pointing down (but not yet…).
You may find that some wheel/axle combinations are “sweeter” than others. If a particular wheel does not run quiet and true on a particular axle, try it on another. When you find a good combination keep the wheels and axles together. The sweet spot on an axle may not be the same if a different wheel is used.
When you have identified the sweet spot you want to work to get as much graphite in the hub as possible. Hold an axle with the wheel hanging down. Puff a bit of graphite down the hub and give the wheel a medium spin. Repeat this until you think you have done it a ridiculous number of times. Then do it another hundred or so times. Now you are half way there. Really, the speed will improve the longer you do this. You are coating the inside of the hub and the axle with a layer of graphite that keeps getting better the longer you do this. You might want to do this over several days making sure to keep the wheels assembled on the axles.
When you have thoroughly worked in the graphite, you are ready for the final assembly. Don’t hammer the axles into the block. You will be able to press fit the axles into the holes you drilled with moderate pressure. You want the wheel to be about a U.S. quarter’s thickness off of the car body. Sometimes drill bits cut oversize a little bit and the axle will slide in too easily. If this happens, you can use a little “super-glue” down the axle hole before you slide the axle in. BE CAREFUL not to let the glue get on the graphite around the axle, and by all means don’t glue your wheels to the axles!
Step 12 – Fine Tune
Weight
At this point you are ready to get the weight as close to race legal as possible. Keep in mind that there is a difference between 5.0 ounces and “race legal.” The scales used at race check-ins are not always perfectly accurate. If your car is exactly 4.99999 ounces, and the race scale says it is 5.05 ounces, the true weight of your car doesn’t matter. On the other hand, if somebody else’s car is 5.049 ounces and the scale says 5.0, they have an advantage.
The Flying Wedge design handles this situation beautifully. Before the official check-in, get your car to read exactly 5.0 ounces with about 5 or 6 #8 washers installed on the adjusting screws. This way, you can add or take away weights to get race legal. At the official check-in, place your car upside down on the official scale. If it reads 5.0 ounces, drop some #8 star washers (these are the lightest ones) onto the car until it reads over 5.0 ounces. Then take off the last one. You may be surprised how many washers you can add to your car and still be race legal. Add these washers to your car and re-check the weight for the last time.
Be sure (kindly) at the check-in that nobody touches the table that the scale is on while the cars are being weighed. This should be a general rule for the check-in, but it is not always the case. Ideally, the scales should be on a heavy table, even on the floor for the most accurate and fair results.
If the kids will be putting their own cars on the track, be sure to tell him or her to align the car properly. Some kids just plop them down on the track and hope for the best. Proper alignment can be the difference between first and last place.
A final note…
As much as your son’s Luke Skywalker action figure would like to go speeding around on the car, he will need to wait until after the big race. I have seen kids slinging their cars across the floor of the room before the race check-in. More than once I have seen wheels and body parts flying off the cars just before the race. It may be hard to resist the temptation to play with the car before the race, but this masterpiece of racing is a finely-tuned, precision machine and needs to be handled with care.
Let me be the first to wish you GOOD LUCK! You have done your best!
56 comments for “The Flying Wedge”