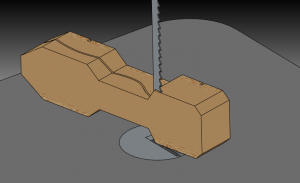
A bandsaw can be used to cut top and side profile. I like to tape the block back together after cutting the top profile.
First of all, I would like to say that bandsaws are very efficient finger removing machines. NEVER ALLOW A CHILD TO OPERATE A BANDSAW!
That said, I have made lots of these cars, and have learned a little bit about what works and what doesn’t. Here are my suggestions:
Before you begin, know that you will need access to a bandsaw to cut the car out, and a drill press to cut holes for the lead. You will also need either a router or a milling cutter to cut out the underside of the car body. Sanding of the wood to its final shape and finish is best done by hand, but a belt sander can help shape the overall contours quickly.
1) First of all, buy two kits for every car you build. Test the wheels on a polished nail to see if they vibrate or wobble. Use the bad wheels for practice when you turn them in a drill press to remove the mold marks and flash. You may need a wheel mandrel or “tuning kit”.
2) Polish the axles in a drill press or a Dremel tool (you need a smaller collet to chuck the axles in a Dremel tool). Use a file to do the rough cutting and progressively finer sandpaper. The higher the sandpaper number, the finer the grit. I start with about 600 grit and then use pumice on a piece of chamois. Then I polish the axle with jewelers’ rouge. You can buy pre-polished axles, but part of the fun is getting the axles just right. By the way, this is the only thing Dremel tools are good for in terms of making pinewood derby cars. They are lousy at shaping the contours.
3) Put the weight in the back of the car. This increases the potential energy that your car has. I put the rear wheels as close to the back of the car as I legally can, so the front does not “wheelie” off the track.
4) Do not point the front end of the car, it will be hard to line it up on the starting gate, and hard for the sensor at the finish line to see it.

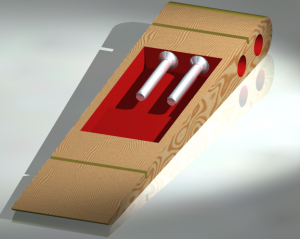
Machine screws allow precise weight adjustment. Simply add flat washers or star washers to increase the weight. I put the car on the scale and add washers until I go over 5.0, then remove the last one.
5) Get as close to 5.0 ounces as you can. I use epoxy to affix a machine screw in a hollowed-out cavity underneath the car. This allows me to add or subtract weight in very fine increments on race day. The one tool you really need access to is a kitchen scale. You should be able to get a reasonably accurate one for about $15.00.
6) Use graphite all over the wheels, inside and out. I like to dump a whole tube of graphite in a zip-lock bag and massage it into the wheels for several days before I put the wheels on.
7) Test the car on a flat-topped table to make sure it rolls straight.
8) Use super glue to glue the nails into the slots. Don’t glue the wheel!
9) Have Fun! Many kids will race, only a few will win. Give it your best shot, be honest and have a great time!
We would all love to see your car, so email us a photo (pinewood@boysdad.com) and we will post it on the site!

14 comments for “Pinewood Derby® Speed Tips”